
The Best Fluffy Pancakes recipe you will fall in love with. Full of tips and tricks to help you make the best pancakes.

Do you remember the smell of your grandmother’s kitchen? It was like a mix of vanilla and coconut. Let’s make that smell again with an easy no-bake vanilla wafer cake. This recipe is a way to bring back happy memories and save time cooking.
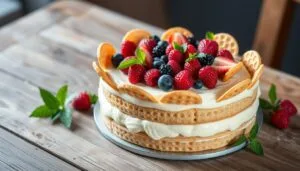
Imagine layers of crunchy vanilla wafers, creamy pudding, and light whipped cream. This no-bake dessert is a mix of textures and tastes that takes you back to summer fun. Plus, it’s really easy to make, so you’ll wonder why you didn’t try it sooner.
This vanilla wafer cake is perfect for any occasion. It’s great for family gatherings, potlucks, or just when you want something sweet. And the best part? You don’t need an oven. Just a few ingredients and some patience while it chills.
Table of Contents
Why This No-Bake Dessert Is Perfect for Any Occasion
The no-bake vanilla wafer cake is a versatile sweet treat. It’s perfect for any event. It’s a favorite among hosts and guests.
Perfect for Summer Celebrations
This dessert is a hit when it’s hot outside. It’s great for summer barbecues and pool parties. It’s quick to make, with no oven needed.
Ideal for Potluck Events
This cake is easy to take and serve at potlucks. It’s made ahead of time, so flavors can blend. It serves 8 to 10 people, perfect for a crowd.
Great for Birthday Parties
The vanilla wafer cake is loved at birthdays. It’s creamy and you can add your favorite toppings. It’s easy to make it look festive with fresh fruit or nuts.
This dessert is also nutritious. It has 508 calories per serving. You can make it in many ways, so it’s always exciting.
| Occasion | Why It’s Perfect |
|---|---|
| Summer Gatherings | No-bake, cool, refreshing |
| Potlucks | Easy to transport, serves 8-10 |
| Birthday Parties | Customizable, crowd-pleasing |
Essential Ingredients for Your Vanilla Wafer Cake
To make a tasty vanilla wafer cake, you need a few key ingredients. Let’s explore what you’ll need for this no-bake dessert that’s sure to wow.
The main ingredient is a 12-ounce box of vanilla wafers. These cookies are the cake’s base, adding a nice crunch. You’ll also need 1 cup each of granulated and brown sugar to sweeten it up.
For the creamy parts, get 1 cup of unsalted butter, 6 large eggs, and 1/2 cup of whole milk. These mix together for a moist and rich texture. Remember, 2 teaspoons of vanilla extract is needed for that classic taste.
To make the cake better, you’ll need:
- 1 teaspoon baking powder
- 1/2 teaspoon salt
- 1 cup chopped pecans
- 1 cup sweetened shredded coconut
For the final touch, have pudding mix and whipped topping ready. These will add a creamy layer that goes great with the vanilla wafers.
| Ingredient | Amount | Purpose |
|---|---|---|
| Vanilla wafers | 12-ounce box | Base and structure |
| Granulated sugar | 1 cup | Sweetness |
| Brown sugar | 1 cup | Moisture and flavor |
| Unsalted butter | 1 cup | Richness |
| Eggs | 6 large | Binding and texture |
| Whole milk | 1/2 cup | Moisture |
| Vanilla extract | 2 teaspoons | Flavor |
With these ingredients, you’re all set to make a delicious vanilla wafer cake. It’s perfect for any special occasion.
Kitchen Tools and Equipment Needed
To make a tasty vanilla wafer cake, you need the right tools. Let’s look at the essential baking tools for this no-bake treat.
Basic Mixing Tools
You’ll need mixing bowls in your kitchen. Choose stainless steel or glass bowls in different sizes. A strong spatula and measuring cups are essential. A hand mixer helps mix smoothly.
Recommended Baking Dish Size
A 9×13 inch baking dish is ideal for this recipe. It’s big enough for layering and serves 12 people. For a fancy look, try a Bundt pan.
Storage Containers
It’s important to store your cake in airtight containers. Pick a container that fits your baking dish. Or, use individual containers for easy serving.
| Kitchen Tool | Purpose | Recommended Type |
|---|---|---|
| Mixing Bowls | Combining ingredients | Stainless steel or glass |
| Spatula | Folding and spreading | Silicone or rubber |
| Baking Dish | Assembling cake | 9×13 inch glass or ceramic |
| Hand Mixer | Blending filling | Electric with multiple speeds |
| Storage Container | Preserving leftovers | Airtight plastic or glass |
Step-by-Step Assembly Process
Making a no-bake vanilla wafer cake is easy with our guide. This method makes a delicious treat without using the oven. Let’s go through the steps together.
Preparing the Cookie Base
Begin by crushing 20 vanilla wafers. Spread these crumbs at the bottom of a 9×13-inch dish. This makes a tasty base for your cake.
Creating the Creamy Filling
Mix pudding with milk until it’s smooth. Add whipped topping for a light texture. This creamy mix is the cake’s heart.
Layering Technique
The secret to a great vanilla wafer cake is layering. Start with cookies, then the creamy filling. Keep alternating until you use everything.

Adding Final Toppings
Top your cake with whipped cream. Add crushed vanilla wafers for crunch. For a fruity touch, add fresh berries or crushed pineapple.
| Layer | Ingredient | Amount |
|---|---|---|
| Base | Crushed vanilla wafers | 20 cookies |
| Filling | Pudding mixture | 3 cups |
| Cookie layers | Whole vanilla wafers | 2-3 layers |
| Topping | Whipped cream | 1 cup |
| Garnish | Crushed vanilla wafers | 1 cup |
Chill your cake for at least 4 hours before serving. It can stay in the fridge for up to 3 days. This is great for making ahead.
Creative Variations and Flavor Combinations
Get ready to explore exciting dessert variations with our no-bake vanilla wafer cake! This versatile treat offers endless possibilities for flavor combinations. Let’s dive into some mouthwatering ideas that’ll transform your dessert game.
Fruit desserts are a popular choice. Try layering sliced strawberries, raspberries, or blueberries between the wafers for a burst of freshness. You can even mix different fruits for a colorful and tasty surprise.
For a richer taste, incorporate cream cheese into your filling. This adds a cheesecake-like flavor that pairs wonderfully with the crisp wafers. If you’re feeling adventurous, swap out the vanilla wafers for graham crackers or vanilla Oreos to create a unique base.
Pudding flavors offer another avenue for creativity. Experiment with chocolate, butterscotch, or even pistachio pudding to craft your perfect dessert. Add chopped nuts like pecans for extra crunch and flavor depth.
| Base | Filling | Topping |
|---|---|---|
| Vanilla Wafers | Banana Pudding | Sliced Bananas |
| Graham Crackers | Chocolate Pudding | Chopped Pecans |
| Vanilla Oreos | Strawberry Cream | Fresh Strawberries |
Remember, the key to creating amazing flavor combinations is to balance textures and tastes. Mix and match these ideas to craft your signature no-bake dessert that’ll wow your friends and family!
Storage Tips and Shelf Life
Keeping your vanilla wafer cake fresh is crucial. Follow these tips to keep it delicious for longer.
Refrigeration Guidelines
Keep your cake cool to enjoy it longer. Put it in the fridge right after you make it. This keeps the wafers crunchy and the filling fresh.
Proper Container Selection
Use an airtight container for your cake. It stops odors and keeps it moist. A plastic or glass container with a tight lid is perfect.
Maximum Storage Duration
The life of your cake depends on a few things. Here’s a quick guide:
| Storage Method | Duration | Notes |
|---|---|---|
| Refrigerated (whole cake) | 4-5 days | Best consumed within first few days |
| Refrigerated (sliced) | 2-3 days | Cover exposed areas with plastic wrap |
| Room temperature | 1-2 days | Not recommended for long-term storage |
Freezing is not good for this dessert. It can ruin the texture. Enjoy your cake within a few days for the best taste.
Expert Tips for Perfect Results
Baking is all about paying attention to details and using expert tricks. These tips will help you make your vanilla wafer cake perfect. We’ll cover how to improve texture, timing, and serving ideas.
Texture Enhancement Tips
For a luxurious texture, add whipped cream to your filling. It makes the cake silky smooth. Use sour cream in the batter for extra moisture and a tender crumb.
For chocolate fans, dust your baking pan with cocoa powder instead of flour. This trick boosts flavor and looks.
Timing Considerations
Being patient is key for the best results. Chill your dessert overnight for perfect flavor blending. Check your oven temperature with a separate thermometer for precise baking.
Serving Suggestions
Make your serving ideas stand out with these creative ideas. Add a berry compote or pastry cream between layers for extra taste. For a fun twist, create an ombre effect with gel food coloring.
| Ingredient | Purpose | Expert Tip |
|---|---|---|
| Whipped Cream | Topping/Filling | Adds luxurious texture |
| Sour Cream | Batter Addition | Improves moistness |
| Cocoa Powder | Pan Coating | Enhances flavor and appearance |
These expert tips are your secret to a stunning vanilla wafer cake. With practice and patience, you’ll soon be serving slices of pure delight.
Nutritional Information and Dietary Considerations
Knowing the dessert nutrition of vanilla wafer cake is key for smart diet choices. A single serving can have 150 to 650 calories, depending on the recipe and size. Most of these calories come from carbs, especially sugar.

Here’s a look at what’s in a standard serving of vanilla wafers, the base of our no-bake cake:
| Nutrient | Amount per Serving (30g) |
|---|---|
| Calories | 130-150 |
| Carbohydrates | 24g |
| Sugar | 5-10g |
| Protein | Minimal |
| Fiber | Minimal |
This dessert isn’t good for those watching their sugar or fat intake. But, there are gluten-free vanilla wafers for those with gluten issues. You can also find flavors like lemon or almond to spice up your cake.
Enjoying this sweet treat in moderation is important. Savor each bite, knowing its impact on your diet.
History of the Classic Vanilla Wafer Cake
The vanilla wafer cake has a long history, starting in the early 20th century. It’s a no-bake treat that became popular in the 1920s and 1930s. This was when Americans looked for easy ways to cook.
The dessert’s story shows how recipes have changed over time. It reflects the shift in what people like to eat.
Origin Story
Icebox cakes, like the vanilla wafer cake, became very popular after World War II. They were perfect for the time because they were easy to make. The exact start of the vanilla wafer cake is not known, but banana pudding gives clues about its beginnings.
Traditional Variations
Old-fashioned vanilla wafer cakes used simple things like vanilla wafers, pudding, and whipped cream. Different places had their own twists, with banana pudding being a favorite in the South. The banana pudding we know today started in 1921 in Bloomington, Illinois.
This shows how recipes can change over time.
Modern Adaptations
Today, vanilla wafer cakes are still evolving. Chefs and home cooks try new flavors and ingredients. The dessert’s simplicity and flexibility have made it popular again.
It’s a favorite for those who love old-fashioned and retro foods. As food trends change, the vanilla wafer cake keeps its charm, staying a beloved treat.
| Time Period | Key Development |
|---|---|
| Early 20th Century | Icebox cakes introduced |
| 1920s-1930s | Popularity rise in the US |
| Post-World War II | Peak popularity of icebox cakes |
| 1921 | Modern banana pudding with Nilla wafers emerges |
| Recent Years | Resurgence due to nostalgia trends |
Conclusion
The no-bake vanilla wafer cake is a top pick for easy desserts. It’s simple and versatile, perfect for quick treats. With just 5 ingredients and 15 minutes of prep, it’s a hit with families.
This dessert is great for any event, from summer parties to potlucks. You can try different versions, like using Chessmen Cookies or graham crackers. Or, go sugar-free with special mixes and Cool Whip.
Keeping your dessert fresh is important. Store it in the fridge for up to 3 days, covered well. With these tips, you’ll make a delicious cake every time. It’s easy, even for beginners, to make a dessert that everyone will love.
FAQ
How long does it take to prepare a no-bake vanilla wafer cake?
Preparing a no-bake vanilla wafer cake takes about 20-30 minutes. But, it’s best to chill it for 4 hours or overnight. This makes the flavors and texture better.
Can I use other cookies instead of vanilla wafers?
Yes, you can use other cookies like graham crackers or vanilla Oreos. But, it might change the taste and feel of the dessert a bit.
How long can I store the vanilla wafer cake in the refrigerator?
You can keep the vanilla wafer cake in the fridge for 4-5 days in an airtight container. It tastes best when eaten within a few days.
Can I freeze the vanilla wafer cake?
Freezing is not a good idea for this dessert. The whipped topping and pudding can change its texture and feel.
What are some popular variations of the vanilla wafer cake?
You can try adding strawberries or blueberries for a twist. Or, use cream cheese for a cheesecake taste. Some people also add nuts like pecans for crunch.
Is the vanilla wafer cake suitable for people with dietary restrictions?
The traditional vanilla wafer cake is not good for low-sugar or low-fat diets. It’s also not right for those with gluten or dairy allergies unless it’s changed.
What’s the best way to serve the vanilla wafer cake?
Serve the cake chilled for the best taste. Add toppings like fresh fruits or cherries just before serving. Cutting it into individual servings is also a good idea for events.
Can I make this dessert ahead of time for an event?
Yes, the vanilla wafer cake is perfect for making ahead. Chilling it overnight can make the flavors and texture even better.


